
Improve SEO by correctly Redirecting WordPress Posts & Pages
Posted on Dec, 4, 2019 I EliseMoving an online resource such as a website to a new address brings about many changes to the page structure. This move can come about as a measure to cope up with business growth changes or just a shift to a new URL or a rebranding move. Even if a certain part of your website needs to be moved, the change needs to be properly taken care of. This is where Redirection comes into the scenario.
A redirect makes the resource available on a fresh URL but accessible through the current link. Broken/expired links or outdated content, a change in the source can trigger the need for redirection. By implementing a redirect, the site visitor is sent to a different page from the originally requested one. The privilege with redirection is that the site owner can still delete a page but send the visitors to a relevant one, the information from which they are looking to access.
If your WordPress website has pages or posts with broken links, you are draining the SEO juice of your website. 404 error pages that indicate the absence of a page or content can really turn off the user experience for your website visitors. Owing to various reasons such as mistyped URLs, wrongly copied and pasted links, or simply deleted pages/posts can create havoc with the SEO of your website. So, if you are a website owner or a site developer who is concerned about the SEO of their website when it is around the need for post and page redirection, this article is going to be a very helpful one.
Need for redirection
There is an unspoken rule when it comes to website management: Always keep testing your website for errors and pages that play any mischief. If you are in a position where you keep testing your website for any malfunction, you might find pages that now display the 404 error. Unpublished or inactive pages may also yield error pages. It also happens a lot that after we have put out down our website down for maintenance, there are instances that some pages turn out to be broken after the revamp. So, if you find any such pages, you must take the measure to put redirection into place. Also, if your website’s SEO matters to you, redirection can help you immensely. This will ensure that your website’s SEO ratings will be in place and there will be stable traffic to your website as well.
301, 302, and Meta Refresh are the most 3 commonly used redirects.
The 301 redirect is a recommended SEO redirect. It is put in place when you are making arrangements for a permanently moved post/page. For a temporarily found or moved page, the 302 redirects are used. The Meta refresh redirect is the one where a message is displayed “If you are not redirected in five seconds, click here.” They are slow and not recommended because they are not UX boosters.
Some other common redirects that you can set up on your posts and pages are the 303, 307, and 308 redirects. While the 307 redirect is similar to the 302 redirects, there’s a slight difference in the body upon the request. A 303 redirect ensures that pages that collect one-time information are prevented from being refreshed. The last of them all, the 308 redirect is sort of a permanent 307 redirect.
Redirects and SEO
Properly implementing a redirect is an SEO enabler. If not done properly, a redirect can do more damage than the intended good. There are certain rules around redirecting that must be followed at all costs. Here are the most important ones:
- A perfect redirect is the one where all the other elements stay the same, except for the URL.
- All redirects come with a risk.
- If your move is going to make a change to the URL, you must make efforts to redirect the pages.
- If you are looking to delete an article that is no longer needed, redirecting the old URL with a 301 to the new one new article. If not, you can simply implement a 410.
- If your blog/website is dense and has a lot of posts and pages that need the redirecting, make a planned strategy before you commit the act.
- 301 redirects result in around a 15% loss of PageRank. So, you must assess your requirements and consequences based on your individual needs.
- Using tools like a redirect checker will help you determine if a certain URL is redirected and to analyze the path it follows. This will help you get hold of any redirect chains that may be acting as a hindrance for the search engines to crawl the URL.
Setting up Redirects with 301 Redirect WordPress plugin
Setting up your website redirects with the help of WordPress plugins can take away the complications of the task. By using plugins such as the 301 Redirects plugin, you will be able to easily manage and create redirects such as the 301 & 302 redirects for your WordPress website and improve the SEO of your WordPress installation. This will help you further enhance the User Experience for your website and stabilize the incoming traffic.

The plugin has a very simple and user-friendly interface so you will be able to easily install and configure it for your website. You can take the help of this plugin to set up the redirects when you are either moving your posts and pages, putting your website down for a maintenance drill, repairing any error pages, or simply reorganizing your content. This plugin will especially be helpful when you are trying to get rid of those 404 pages and do not want to turn away your site visitors.
The plugin lets you use its drop-down menu and choose to set up redirects for Pages, Posts, Custom Post Types, Archives, and Term Archives. With this plugin, you can set up redirects in a jiffy and even set a custom destination URL for your content/pages/posts. The plugin comes with a feature to manage bulk redirects through the options for Import/Export.
How to put the 301 Redirect plugin to use?
Begin with the download and installation with the plugin. To get that done, you will have to upload the eps-301-redirects folder to the /wp-content/plugins/ directory of your WordPress installation. Once you have installed it, it is time to activate the plugin and start setting up the redirects.
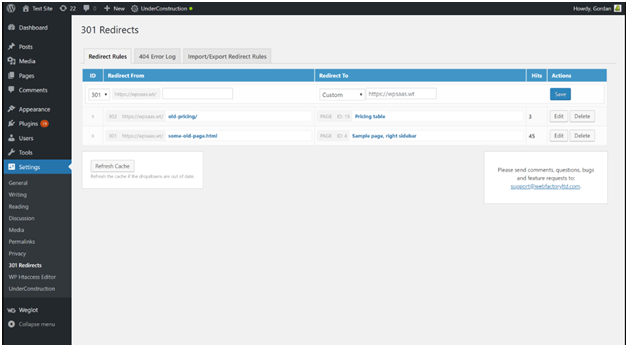
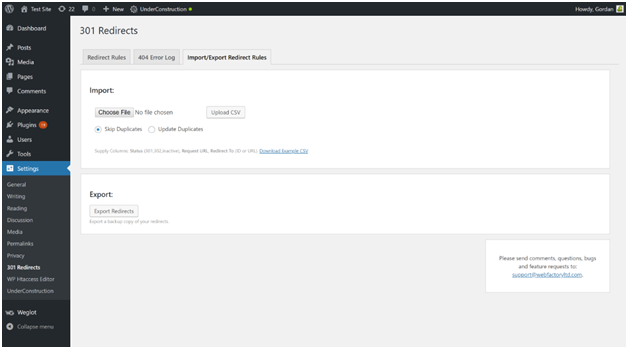
To get started with this plugin and begin setting up the required redirects, you will first have to locate the 301 Redirects GUI. You will find it by navigating to your site’s dashboard and then go to Settings where you will find the 301 Redirects GUI. Here are a few screenshots to help you understand the BTS of this plugin use.
Conclusion:
WordPress redirects make redirect seem like a cake. However, without thorough knowledge, they can get complicated. If you manage to grasp the part that involved managing these redirects, you have half the task sorted. You might be looking to learn more about setting up a site-wide redirect for your WordPress website, but that is a topic to be explored in complete depth with a separate blog post.
Right now, for the ones who need it, learning to properly set up redirects that improve your SEO is the best thing to do. With the information furnished above, we hope that we were able to provide a platform to help you get started with this redirection game. So, if you have questions about redirects, let us know in the comments.


Leave a Reply